Nuxt Blog: Project Setup
In this tutorial we will cover how to setup a NuxtJS project. It assumes you have covered the prerequisites. This tutorial is part of a multipart series on how to create a nuxt based blog.
- Lets Get Started
To get started type the following into the command line making sure to be in your projects root directory:
npx create-nuxt-app my-first-app
This will execute the create-nuxt-app package using npx with the optional argument my-first-app as the project name. You will then be asked asked a bunch of questions regarding how to set up your project. Here is what I selected:

- Project name: Defaults to my-fist-app in this case
- Programming language: I chose Javascript here for simplicity but you might want to consider using Typescript as it can give a better developer experience.
- Package Manager: We will use npm as this is what we have installed already.
- UI Framework: Plenty of good options here. I chose Vuetify.js as it’s a very good framework and I have a lot of experience working with it.
- Linting Tools: I’ve selected ESLint to enforce some good practice rules and Prettier to format my code. Here is a discussion on the difference.
- Testing Framework: For simplicity no testing will be implemented at this stage.
- Rendering mode: As we plan to deliver a static site in the end we will choose Universal.
- Deployment target: Static, for the reasons above.
- Folder Structure
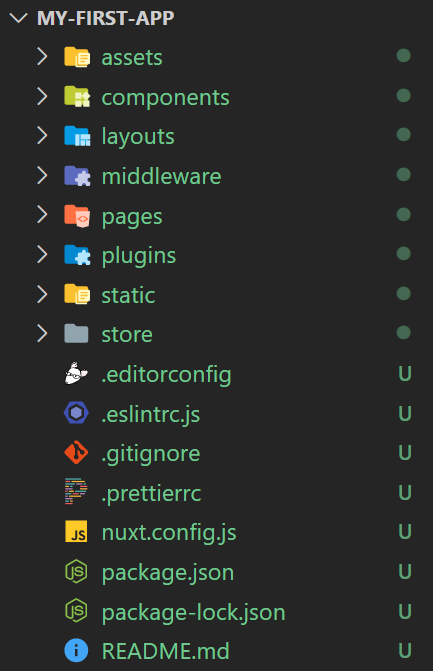
This should result in a folder structure like this:

- Assets: Uncompiled assets such as images
- Components: Vue.js components
- Layouts: Your application layouts. Your default layout will be used to wrap elements such as header and footer around your main content. The error layout will be shown if a page can’t be found (404)
- Middleware: A place to define custom functions which can be run before the page renders. Not used in this tutorial.
- Pages: This is where your applications routes and views will live
- Plugins: JS plugins that need to be run before mounting the main project.
- Static: Files which will be mapped to the root domain.
- Store: Vuex store used for state management.
You will also notice a nuxt.config.js file in your root. This is an important file and is where you will do a lot of project configuration. If you take a look at it now you will see the configuration of the options you selected earlier. For example mode: universal and target: static. You will also notice the Vuetify presentation library you selected earlier is configured here.
Ok, Almost there! Now in the command line move into your project directory:
cd my-first-app
and then run this command to finally get going in development mode:
npm run dev
Once the project has been built go to localhost:3000 to see the default project up and running. Any changes you now make to your project should get update live!
- Summary
All done! You now have your very own static NuxtJS project up and running. The next step is to add some content
I hope this post was helpful. Please get in touch with any feedback you have: