Nuxt Blog: Create Posts
Now that we have a basic site up and running it’s time to add some content! There are many ways to do this. Often a CMS is used and the content is provided via API calls. This allows non technical people the ability to create and update posts in a user friendly way.
However this is an extra layer that needs to be added to the site and in my case, as I’m the only one adding posts, I can implement it in a more tightly coupled way.
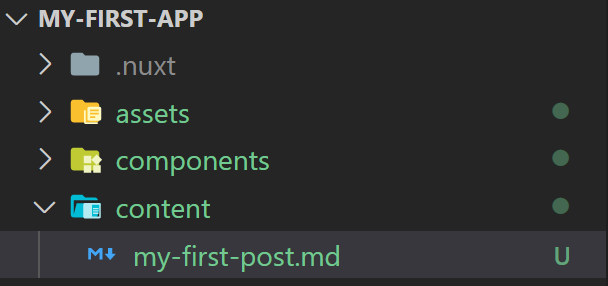
My approach will be to add a content folder to the project root and populate that folder with markdown files. These markdown files will then be converted to routes by Nuxt during the build.
- Create Dynamic Routes
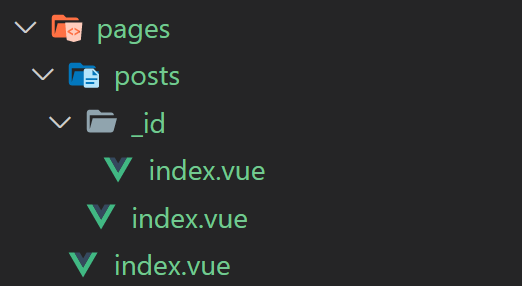
First we need to give Nuxt some information so it knows what routes to create for us. In the pages folder add a new folder called posts. Within this folder add another one named _id. The underscore is important as it lets Nuxt know a parameter named id will be sent to that route. We use this ID to determine which post to present.
Add an index.vue file to each folder. This is the default file to be displayed on that route. So now this folder structure:

Nuxt will convert this folder structure into the following routes:
router: {
  routes: [
    {
      name: 'index',
      path: '/',
      component: 'pages/index.vue'
    },
    {
      name: 'index',
      path: '/posts',
      component: 'pages/posts/index.vue'
    },
    {
      name: 'posts-id',
      path: '/posts/:id?',
      component: 'pages/posts/_id/index.vue'
    }
  ]
}
Check out the NuxtJS documentation on routing if you want more details.
Now we have some dynamic routes set up, lets view them! First get the development server running:
npm run dev
This server will watch your project files and update when they do (on save) so no need to manually reload it on every change.
- All Posts
First lets create an endpoint to view all of our posts. To do so add this content to the file pages/posts/index.vue:
<template>
  <h1>All Posts</h1>
</template>
Now, if you navigate to http://localhost:3333/posts you will see the text All Posts! This is the basic way to populate and display pages with Nuxt.
- Single Post
Now for the interesting bit…lets create an end point for our single posts. Add this to the file pages/posts/_id/index.vue:
<template>
  <h1>Post Id: {{ this.$route.params.id }}</h1>
</template>
Now if you navigate to http://localhost:3333/posts/my-first-post you will see the id has been extracted from the route! The id property on the params object is created based on the folder name _id. If this folder was named _slug you would access the property like this this.\$route.params.slug.
- Markdown Content
The first step is to add some markdown files. Create a new folder in your route directory called content. Within this directory add two files called my-first-post.md and my-second-post.md. Add some unique dummy text to each of the files.

- Markdown Loader
The next step is to tell Nuxt how to load these files. To do so we need to install a markdown loader to handle .md files. There are a lot of loaders out there but I decided upon frontmatter-markdown-loader. The creator of this library even has a Nuxt specific example here. Install it like this:
npm install frontmatter-markdown-loader
Once installed you will need to configure it to work with Nuxt/webpack in nuxt.config.js (found in your root directory). In the build section add the following:
  build: {
    extend(config, ctx) {
      config.module.rules.push({
        test: /\.md$/,
        include: path.resolve(__dirname, 'content'),
        loader: 'frontmatter-markdown-loader',
        options: {
          mode: [Mode.VUE_COMPONENT, Mode.META]
        }
      })
    }
  }
This tells Nuxt/webpack to use the frontmatter-markdown-loader on
.md (markdown) files found within the content folder. We’ve also added a couple of options:
Mode.VUE_COMPONENTgets a markdown parsed vue componentMode.METAgets the metadata of the frontmatter markdown file
Also you will need to import path to help resolve the content folder location:
import path from ‘path’
and Mode so the correct options can be selected:
import Mode from ‘frontmatter-markdown-loader/mode’
Now Nuxt knows what to do whenever it encounters a markdown file in your project.
- Metadata
To help describe the data contained within each post we will add some metadata, also known as markdown attributes. This is useful for many things such as adding an ID (to help with routing) or a Date (to help with sorting). The markdown format is normally just for presentation of data and therefore doesn’t have the option to include metadata as standard. However thanks to the markdown loader we just added we can add whatever metadata we want!
Add the following to your my-first-post file:
---
id: 'my-first-post'
date: '2020-07-20'
title: 'My First Post'
---
And do the same to the my-second-post but amend the field content accordingly.
- Load Posts
Now we have the routes set up and the ability to add and load markdown files, lets see it all in action!
- All Posts
The most basic way to display all the posts is to create a list of clickable links. This concept can then be built upon to create a more user friendly interface such as clickable cards which display some of the metadata.
The route we created to get all our posts is http://localhost:3333/posts/ which was generated when we created the file pages/posts/index.vue. Open this file up in your editor. Currently it should show an h1 header tag with the content “All Posts”. Replace its content with the following:
<template>
  <div>
    <h1>All Post</h1>
    <nuxt-link v-for="post in posts" :key="post.id" :to="`/posts/${post.id}`">
      {{ post.title }}
    </nuxt-link>
  </div>
</template>

<script>
  export default {
    async asyncData() {
      const postIds = ['my-first-post', 'my-second-post']
      const posts = await Promise.all(
        postIds.map(async (id) => {
          const post = await import(`~/content/${id}.md`)
          return post.attributes
        })
      )
      return { posts }
    }
  }
</script>
In the template section we have created a v-for loop to iterate through all our posts. Now for each post it will display the post title and link directly to it.
In the script section you can see we have created a posts object in the Nuxt asyncData call using async/await. We then wait until all the promises have resolved and given us our posts data. We then return this data as a Vue data object called posts. Note that we are only extracting the posts attributes (metadata). The actual content isn’t needed at this stage and is extracted on the single post route.
For this to work we need a list of post IDs which can be annoying to maintain. Later in this tutorial series I will show you how to automate this list.
Now save all the files in the editor and view your all posts route on you blog. You should see two hyperlinks - one for each post in our content folder!
- Single Post
The next step is to create a single posts - this is where your actual blog data will be presented. Click on one of the hyperlinks created in the previous step. You should see the post id being displayed which is what we set up earlier.
In your single post file pages/posts/\_id/index.vue update the template section and add a script section:
<template>
  <div>
    <h1>{{ title }}</h1>
    <component :is="postComponent" />
  </div>
</template>

<script>
export default {
  data() {
    return {
      postComponent: null,
      title: null
    }
  },
  created() {
    const markdown = require(`~/content/${this.$route.params.id.toString()}.md`)
    this.postComponent = markdown.vue.component
    this.title = markdown.attributes.title
  }
}
</script>
Now in your single post route you should see the post title and content being displayed! So what is this code doing?
The component tag represents a dynamic vue component. The special attribute is allows us to provide a component object (‘postComponent’) to be processed by Vue. Because we selected the Mode.VUE_COMPONENT option of the markdown loader we are able to provide the required component object (‘markdown.vue.component’). In the same way we selected the Mode.META option which allows us to extract the posts attribute data and display the title field.
- Summary
Congratulations! You’ve now have the ability to add and retrieve blog posts! Visually it all looks terrible but our first goal was to get it working. In future posts I’ll suggest some ways to format the site to make it more appealing.
I hope this post was helpful. Please get in touch with any feedback you have: